
Although our blogs are written in present tense, our trip was Oct.7-16. We’re posting afterwards because there simply was no time to write during the cruise. These tips are based on the conditions we encountered.
Most of the naturalist-guides on Lindblad’s National Geographic Endeavour are also expert photographers. Two photography sessions are held on board, one on techniques early in the trip and one on how to share your photos with friends at the end. On the land excursions, you may be asked the first day if you have any camera questions but after that it is up to you.
Although I have been selling my photographs internationally for several decades, I know the local photo pros know more than I can possibly anticipate for the landings and what lenses I should have ready. If you’re serious about your photos, let the guides know. On our trip, naturalist Jason Heilman was outstanding but I only did one landing with him. Jason also was in charge of the two evening photo sessions and always was willing to answer questions.
By chance, Galapagos-born Aura Banda Cruz was my guide most of the time toward the end of the trip. I happened to ask her about the lighting conditions for an upcoming landing. She advised me not only that but what lenses to carry for that landing but on later landings without my asking.
The Endeavour guides will give you as much help as you want, but they won’t push their knowledge on you. You have to ask.
If naturalist Walter Perez happens to be your guide, Linda advises following him for the good shots. He always has his camera ready and after many years of guiding knows precisely where to go. Linda’s upcoming photos in later blogs will prove Walter’s knowledge.
Galapagos Photo Tips—Finally!
You can always count on finding El Capitan in Yosemite or a fishing village in Maine. The Galapagos guarantees only one thing: lava rock, and loads of it. Yet even some of those landscapes are amazingly photogenic. The animals, however, are on their own schedule based on time of the year and time of day. There are no guarantees of how many animals you will encounter or what they will be doing unless you do prior research on their nesting or mating season and travel accordingly.
") Setting off for another land excursion and more animal encounters from Lindblad’s National Geographic Endeavour
Setting off for another land excursion and more animal encounters from Lindblad’s National Geographic Endeavour
Animals, of course, are what every photographer usually concentrates on. Their amazing tolerance and universal acceptance of our presence is why it’s so easy to capture such good photographs of them. Although Galapagos wildlife allow us to approach them closely, respecting their personal space is essential. When we cross a boundary, they react by leaving or changing their behavior, such as ending their feeding and staring at us. That’s one reason why the National Park Service doesn’t allow visitors to get too close or to touch any of the creatures.
Expect the Lindblad naturalists on the Endeavour to emphasize this over and over again. They take respect for the animals seriously. It’s too bad the staffs of other tour groups haven’t. In late August of this year, the Galapagos National Park Service closed visitor access to the two giant tortoise corrals in the Tortoise Center on Santa Cruz where visitors were able previously to walk among the tortoises. This was done because of littering and repeated violations of the two meter rule (6.5 feet) in approaching the tortoises. The National Park Service criticized the conduct of both naturalist guides and tourists. Say
good-bye to one of the prime locations for Galapagos tortoise pictures on a face-to-face basis.
How To Photograph In the Galapagos
These tips should work for stills or videos
Types of animal photos to take:
Establishing shot of the animal’s environment
Portraits, including both the complete animal and face close-ups
Behavior
Action/motion
Interaction with other animals and visitors
Humor—some animals do some very funny things
Choose a subject:
Find the best looking animal–or one that represents the point you are trying to make with your photo, such as an animal in distress.
Observe the animal’s behavior.
Many animals repeat their actions, which allows you to anticipate what may happen. Patience is the key. If the animal moves its head frequently, test your camera’s speed and take as many sequence photos as rapidly as you can. Use the fastest speed the light conditions allows. You may end up throwing most of the images away but you should have several good shots.
Use a natural background.
Show that the photos really were taken in the Galapagos and not in a zoo. Definitely take the tight portrait shots but also show the animal’s background from all angles. That usually means getting on the ground, at eye level with the animal. If you take all your photos by looking down on animals, the photos can appear condescending because the camera is tilted down on all the subjects. Still, in some circumstances, looking down is the only position to take. To be on the safe side, take the look-down angle first so you at least have a photo of your subject in case it moves away once you’re at it’s level.
The eyes have it!
Before pressing the shutter for an animal portrait, make sure the you can see the animal’s eye. If the eye isn’t bright and brilliant, wait until your subject changes its position. If it start shaking its head and isn’t likely to calm down, shoot that burst of images and hope for the best.
") Fill flash would remove the shadowing from this Galapagos hawk’s eye
Fill flash would remove the shadowing from this Galapagos hawk’s eye
but flash is not permitted when photographing animals.
No flashing allowed
Using a flash is the most reliable way to make sure the close-up portraits are colorful and that the eye is sparkling. A flash is forbidden in the Galapagos. The animals react to it badly, often running away. If you have a point-and-shoot camera where the flash won’t turn off, get another camera for your trip. If your camera’s flash won’t turn off, you may not be allowed to use it. Not because the naturalist guides tell you not to: the other photographers will stop you because you’re messing up their photos. On one excursion, a woman’s flash went off and so did the land iguana she photographed–quickly–leaving everyone else with a blur of the iguana’s backside. Words of instruction were exchanged.
The need for speed
The most dramatic photos tend to happen in the blink of an eye, faster than you can imagine. If you don’t respond rapidly, you’ll miss the action entirely. That means staying mobile, instantly alert, with the ability instantly to point your camera anywhere.
With a telephoto lens, you will need to shoot the fast action at least at 1/500 second, preferably 1/1000 second. A 300mm lens is about as large as most people can handle without the aid of a tripod. Above 300mm, camera shake will blur the image, putting everything out of focus, despite the ever increasing advances in digital lenses and cameras. Don’t depend on any anti-shake, stabilizing device. I use a Nikon 80-400mm lens and try to shoot everything at least at 1/1000 second because it’s a heavy lens. Even if all my photos are in focus, the subject tends to change its location because it’s difficult to keep the lens stationary without a tripod/unipod, which is impractical. I’m happier if I can shoot at 1/2000 second, which often happens at 400 ISO even with the usual light cloudy overcast.
")
This is why you always need to be prepared. These dolphin suddenly appeared beside our Zodiac and were this close for only a brief period.
Tripod vs. Unipod
The National Park Service regulates where and when all the Galapagos cruise ships go. Depending on the other activities planned for the visit to a particular visitor site, the pace of the walk usually is too brisk for a tripod. Even the Endeavour videographer had to rush to catch up with us because he frequently relied on a tripod. A unipod works better as long as it and your camera have a matching quick release plate. However, a unipod can get in the way for ground level shooting. Most of the photographers who took tripods stopped using them after the first couple of walks. I didn’t bother to take my unipod off the ship.
The camera equipment
I carry two Nikon 7000 digital SLR cameras capable of shooting seven frames a second. That usually captures the fastest action if I have the ISO high enough. With two cameras, I rarely change lenses. With a digital camera, changing lenses invites dust into your photos unless your camera is able to clean the sensor. In addition to a good telephoto lens, a wide angle lens is also excellent for landscapes and plant/flower close-ups; I use a 12-24mm zoom lens.
My favorite lens is a Nikon 18-200mm zoom because of its amazing versatility. It works well for the majority of wildlife subjects unless you want eyeball close-ups. I also carry a fisheye lens that I never had time to use on most landings. However, it was the only lens that could fully capture the huge pit craters (Los Gemelos) in the Santa Cruz highlands. For telephoto images, my workhorse lens is a Nikon 80-400mm zoom.
The essential backpack
All island visits are with Zodiacs (pangas). Most landings are called “wet landings” where you have to scramble out of the boat and step into shallow water. You need both hands to do that safely, and that means putting your camera(s) in a backpack where they won’t get wet. You can waterproof your backpack by placing your cameras in a thick plastic bag and then placing them inside the pack.
The garua effect on photography
We encountered the cloud layers many times during the first part of our cruise. Despite the clouds, the amount of light was surprisingly bright, allowing the use of my 400mm lens most of the time. The cloud cover meant that although nothing was as bright as it might be, the clouds did prevent any harsh contrast or animal eye shadows. In these conditions, put your digital camera’s white balance on cloudy. If you don’t know how to do that, you’ll learn during one of the first after dinner photo sessions on board the Endeavour. Or ask your naturalist.") Our plane landing at Baltra; this is typical “garua: weather. Yuck
Our plane landing at Baltra; this is typical “garua: weather. Yuck
Photographing during the rainy season
Nothing can withstand rain except a waterproof camera. One guide advised me that Olympus water-resistant cameras had failed during the rainy season. Olympus sells waterproof housings for such cameras. So, if you own an Olympus, be aware. There is a big difference between water-resistance and waterproof. Olympus, Nikon and others sell waterproof cameras, some of them point-and shoots.
Lindblad Endeavour Galapagos Cruise Links
The Galapagos Experience Endeavour Dining
Galapagos Adventure Upcoming Sustainable Dining Policy
How Darwin Saved The Galapagos Saturday Dining Menus
Galapagos Photo Tips Sunday Dining Menus
What To Pack For Cruise Monday Dining Menus
Getting to Guayaquil Tuesday Dining Menus
Las Bachas Shore Landing Wednesday Dining Menus
North Seymour Shore Landing Thursday Dining Menus
Fernandina & Isabela Islands Friday Finale Menus
Urbina Bay Shore Landing Endeavour Recipes
Life Aboard The Endeavour
More About Life On Board
Puerto Egas Shore Landing
Endeavour’s Floating SPA
Meeting One of World’s Rarest Animals
Puerto Ayoro Walking Tour
Santa Cruz Highlands Tour
Hunting Tortoises in the Santa Cruz Highlands
San Cristobal, Endeavour’s final stop
 Follow
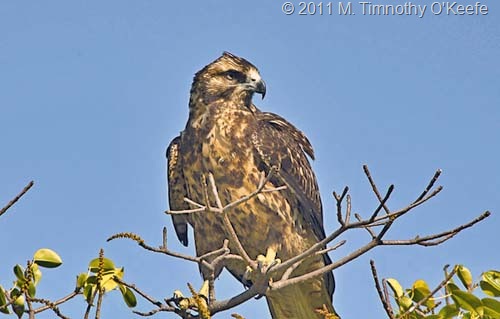